Make Do & Mend
#throwbackthursday
By: Sabrina Merks
For the next few weeks I will be sharing some crafts and things you can do while at home and to get yourself ready for a fruitful spring! I will be learning to sew on a button!
Much like the use of military insignia to identify its wearer by association with an organization and his/her achievements, the pins and buttons were meant to be worn by Canadians on the home front during World War I to show their membership in an organization and/or their contribution to a particular war effort. The pins and buttons displayed the wearer's patriotism and generosity and undoubtedly also served to prompt others to become involved in the various war efforts. Women were heavily involved in the organizations and war efforts with which these objects are associated.
On with the tutorial!
Tools You’ll Need:
- Needle (2 if possible) – any basic sewing needle will do, the slimmer the better.
- Thread – you’ll need about 12″ to do the whole process. If you double your threads over (a bit stronger and easier to knot), use 24″. Try to use a thread that matches the garment colour.
- Button – the original, if possible, otherwise simply use what you can find. Most shirts will have a spare set of buttons sewn on the inside of the bottom front. Note: some buttons have two holes, others have four.
- Cutting tool – Scissors, knife, or something sharp to cut the excess thread. You can use your teeth in a pinch.
Step 1: Thread the Needle & Knot the End
Step 2: Create Anchor “X” Point
Starting at the back end of the fabric, run the needle through to the front where the button is going to be needed. Run the thread through to the back, and then again back to the front. You want to create a small “X” where the button will be centred. This X is also the reinforced anchor for the thread to ensure it doesn’t loosen during stress.
Step 3: Position the Button

Put the button on the anchor “X” and begin sewing by pushing the needle from the back to the front through the first button hole. At this point you want to add the spacer (a second needle or a toothpick, pin, or small stick can be used).
Push the needle up from the underside of the garment and through one of the holes on the button. Pull the thread all the way through until the knot snugs against the underside of the fabric. Use a fingertip to keep the button in its place.
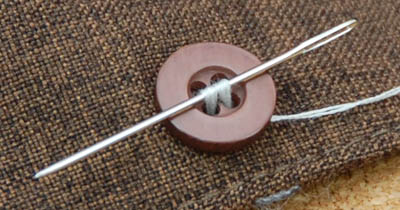
Turn the needle around and push it back down through the hole opposite the one you came up from. Push it all the way through and tug the thread tight. You should be left with a single small line of thread across the button, connecting the two holes.
You’ll repeat this process for six passes, three for each set of holes on the button.
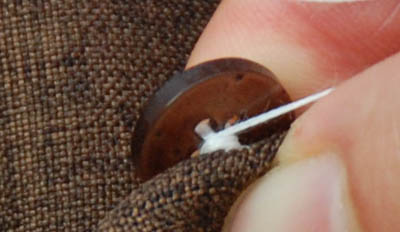
Step 4: Create the Shank
On your last repetition of the previous step, come back up through the fabric but not through the button. Come up like you were going to go through the usual hole in the button, but turn the needle aside and bring it out from underneath the button.
Use the needle to wrap your thread around the threads beneath the button. Make six loops around the bridges of thread that connect the button to the fabric, behind the button itself.
Pull tight and then dive the needle back into the base to be tied off on the other side of the fabric.
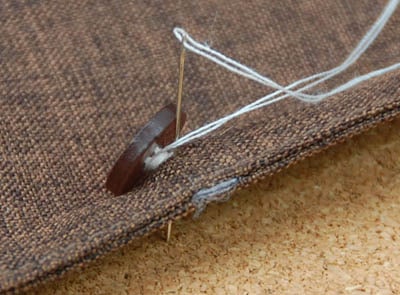
Step 5: Tie It Off
Make a small knot on the back side of the fabric. You can use the needle to guide the thread through a knot or you can snip the thread off the needle and tie the knot in the slack with your fingers, but either way you want it snug up against the back of the fabric.
Probably the easiest knot to tie off is a simple overhand loop tied with the needle still attached. Pin the thread down right against the back of the fabric, under the button, then make a little circle in the thread just beyond your fingertip and pass the needle through the circle. Tighten it down and then cut off the excess fabric.
And that is how you mend a button! If you try this at home let us know what you make! Thanks for reading!
If you have any spare change, consider donating to help the Museum.
1 comment:
Nice post thanks for shaaring
Post a Comment